Showing posts with label tutorial. Show all posts

Monday, April 29, 2013

How To Make a Quilt Braid: A Tutorial

It is our desire that this blog will be a place of inspiration for our customers and readers! Today, we are going to show you a tutorial for constructing a Quilt Braid or "herringbone" design by piecing fabric with a unique Creative Grids Trapezoid Ruler we have in store!

Before we get started with this amazing quilting technique today using the awesome Trapezoid Creative Grids ruler, we wanted to let you know about a few upcoming store offerings this week!

Don't Miss!!! (check calendar for more info!)
  • Mamie Dress Pattern Class Taught by Susan (Tuesday, 9am - 3:30pm)
  • Serger Technique Workbook Class (Wednesday, 10am - 12pm)
  • Introduction to Machine Quilting (Thursday, 10am - 2pm) 
  • Palette 9 and Masterworks Software Class (Friday) 
  • Beginning Sewing Part 1 (Saturday, 9am - 1pm) 
Okay! Now to this *neat* technique using this Creative Grids Trapezoid Ruler designed by Rachel Cross that we have in store! This is the ruler that we are using today!


With this ruler, you can both cut 2.5'' strips AND cut your trapezoids needed to build a quilt braid (or Herringbone) pattern. You will create a 5'' Trapezoid using this ruler and we love it, because it saves you a lot of time and fumbling with several different rulers!
Ready to see how this is done? It truly is so fast and easy!

1.Cut your 2.5'' strip!
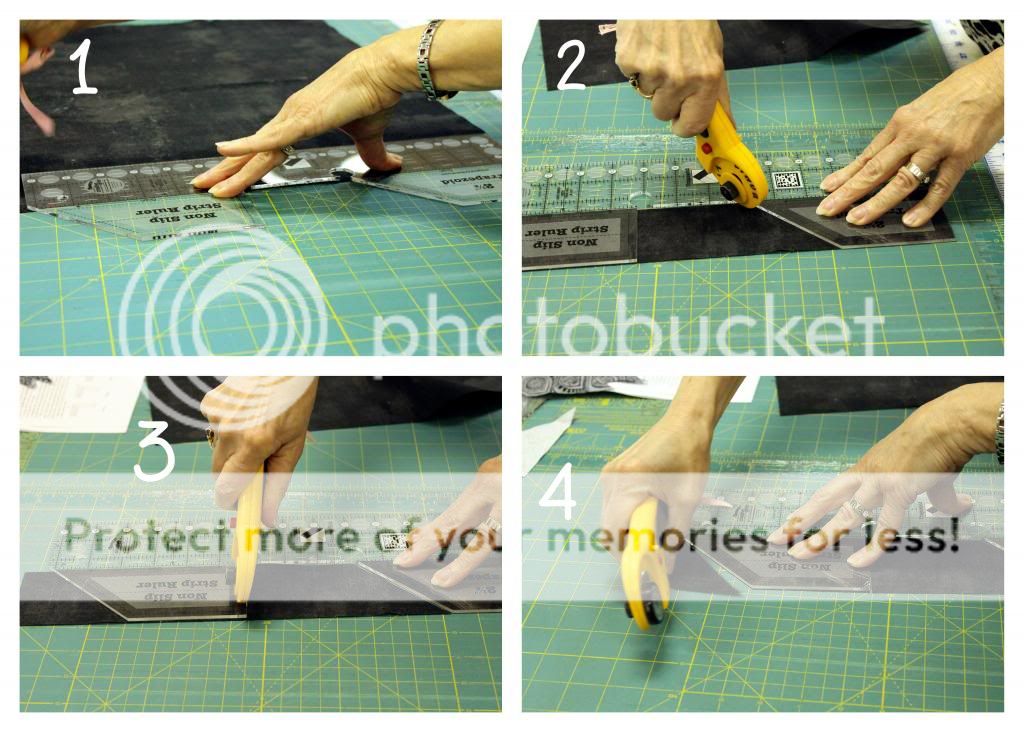
2. Now move your ruler down and line up your trapezoid section of your ruler along the top edge of the fabric. Cut your fabric strip at each of the trapezoid cut out sections with your rotary cutter (2, 3, 4).

Repeat this process again 2 or 3 times to get different coordinating fabrics to fit together. We used 2 different fabrics to create one braid to model for you.

Lastly, we will show you how to layout your pieces to create this braid design, then leave the quilting piecing up to you for whatever project you are working on!
Using 1/4'' seam, join these pieces together to create this braid effect!
Use this technique for quilts, braids, neat fabric designs, and more! The options are endless!

Wednesday, April 24, 2013

Install a Zipper with your Serger: A Tutorial

One thing we'd like to start having on the blog are little tutorials for our readers, so today, we are going to get started with something amazing! Installing a zipper with your serger!

Many of you know that if you purchase a machine from Creative Sewing, you actually are able to have FREE access to our monthly clubs! One of these clubs is called Serger Technique and you can gain a WEALTH of serging knowledge in it! We would LOVE to have more of our faithful customers attend this club! We taught this zipper skill in this club this week and everyone was amazed at how easy it was to do!

Installing zippers with your serger is a perfect thing to do when needing a zipper in a pillow or a bag, it's not used quite as often in garment construction, but could be in some cases.

For this tutorial, you will need:
  • two scraps to practice with
  • a cording foot for your serger
  • an extra long zipper (you always want MORE zipper than you need) 
Make sure you start with your needle all the way up. We are serging with the incredible BabyLock sergers, so there is usually an added ease of use with these machines than others. You will need to practice to make sure your serger is set at the right settings for your machine.

Ready to get started!?
Snap that cording foot onto your machine and set your machine to a 4 Thread Overlock. Length 2.5 - 3.5; Width from 6.5 - 7.5. If you are using one of our amazing BabyLock sergers, then you will also need Stitch Selector A.

Your zipper will guide through the cording groove.

Next, lay your zipper on the right side of your fabric, right sides together. You can leave a little seam allowance if desired, but it is not necessary. If you do, your knife will trim it off!
Next, feed your coil through the cording groove and serge your zipper in place.
Next, flip your zipper around the opposite direction and repeat these same serger steps!
And that is IT! You've installed a zipper! Perfect for bags, purses, and the like!  It's so fast and easy, you will definitely want a serger, if you don't have one!
It looks so well done and professional inside, serging really takes your hand-made item to the next level!

This was one of FOUR techniques covered in the FREE clubs that Creative Sewing offers to customers that have purchased machines! Please be sure to sign up for this monthly club and take advantage of the wealth of knowledge and skills that can be gained through it!